|
|
|
![]()
Introduction
The Hawks are currently battling amongst themselves to hold one or more of 3 titles of Champion of the Field to be granted in AOW, AC and FB respectivly. On this page we will examine these battles as they happen and offer the "movies" of these actual conflicts for public viewing. Click on the mini-map of the conflict you wish to watch. Un-zip the file and place in the Main Directory of the corresponding game. You must also have the appropriate map loaded in your Main Directory to view the recorded game. Enjoy.
Rd 1 AOW) Jark vs UK at Boyne
Jark (red) moves fast as he crosses the river in the north/east. _jark_vs_uk_at_boyne.jpg)
He quickly establishes a beachhead without opposition. UK (blue) forms a flank with some troops from his southern and northern towns against the now very secure beachhead. Jark in the meantime, taking most of his troops from the north, pours more troops across the river.
Jark keeps most of his men in the south-west stationary preventing UK from sending many reinforcements to the battle. Jark crushes the attempted flank maneuver by UK . At this point Jark carefully closes the noose around UK and aligns his forces. With Jark pounding canons leading his army he quickly captures UK northern town.
A final push finishes UK remaining forces in his southern town.
(Review by [HWK]Myself)
____________________________________________________________________________________________________________
Rd 1 FB) GiN3RfisH Vs Person at Hussar
_fb_map_g3_vs_person.jpg) GiN3rFiSh (blue) moves forward quickly, taking early possesion of the town. Person (red) arranges his forces in an angle facing it, refusing his right in an impressive defensive position. Person' s has all his heavy cavlary concentrated on his extreme right and they move forward. G3 moves up to meet them while enveloping them from the left though Person' s infantry squares prevent enveloping from the right. The centers meanwhile cautiously engage but on map right nothing happens for awhile, the town anchoring G3' s right flank. Person 's heavy cavalry eventually win out on map left, moving forward along G3 's line. The Center is now actively engaged and G3 again attempts to envelope Person s' threatening heavy cavalry (his own hvy cavalry located on map right). The flanking has it's affects on Person' s tightly packed horse, and soon map left shows large areas of retreating red curaissars. G3 also moves his line infantry forward map right, and flanks Person' s left. In the end, Person gathers his few hundred troops in map center and attacks G3' s right as G3 en-circles him with his own 1,400 remaining troops.
GiN3rFiSh (blue) moves forward quickly, taking early possesion of the town. Person (red) arranges his forces in an angle facing it, refusing his right in an impressive defensive position. Person' s has all his heavy cavlary concentrated on his extreme right and they move forward. G3 moves up to meet them while enveloping them from the left though Person' s infantry squares prevent enveloping from the right. The centers meanwhile cautiously engage but on map right nothing happens for awhile, the town anchoring G3' s right flank. Person 's heavy cavalry eventually win out on map left, moving forward along G3 's line. The Center is now actively engaged and G3 again attempts to envelope Person s' threatening heavy cavalry (his own hvy cavalry located on map right). The flanking has it's affects on Person' s tightly packed horse, and soon map left shows large areas of retreating red curaissars. G3 also moves his line infantry forward map right, and flanks Person' s left. In the end, Person gathers his few hundred troops in map center and attacks G3' s right as G3 en-circles him with his own 1,400 remaining troops.
(Review by [HWK]THE DRAKE)
____________________________________________________________________________________________________________
Rd 1 FB) Greenwarrior vs Wombat at Hussar
Greenwarrior (blue) moves first, racing up to the town and anchoring his right flank while Wombat eventualy moves down and forms an oblique defensive position which reaches the west and north sides of the map. Wombat begins with an artillery barrage while Green continues to organise. Green 's position is more dense, stacked deep as opposed to wide. Cavalry skrimishing occurs at the center which eventually brings in more and more regiments. Wombat starts to pull his left flank (map top/ctr) down to meet the growing threat to his middle. Though the confligration grows, Green continues to hold the majority of his forces in reserve, choosing instead to attack and withdraw with his forward troops. He has formed a solid wall; cavalry formed in wedge, intervalled with infantry squares and cannon. Wombat now committs his 1,000+ formation of dragoons, drawn up3 regiments wide and 4 deep, held just behind his center. Green starts to pull back, and Wombat seems to be gaining the field. However, Wombat runs into the garrisoned town and Greens solid reserve formations. Tragically, Wombat's once proud massive charge starts to break up and 100s of horse start to flee to the rear. Green's formations stand solid in the ctr while he begins to fold his right around Wombat's left. Wombat's formation of 500+ heavy cavalry, who has been sitting well formed patiently opposite Green ctr, finally charge. It is to late, as Green committs his own reserves. Even Wombat' s well times grape in ctr do nothing to stem the tide as his flanks are turned, and the majority of his troops put to flight. Wombat concedes deafeat. Green is left with the field and an army of 2,300 fighting men.
(Review by [HWK]THE DRAKE)
_____________________________________________________________________________________________________________
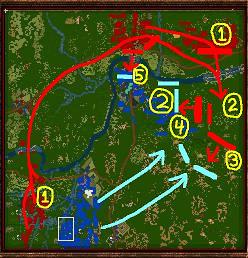
Rd 1 AOW) Dark Lord vs Rehctaw at Boyne
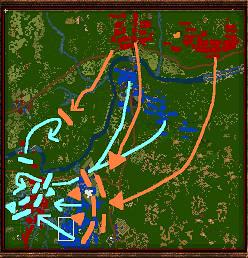
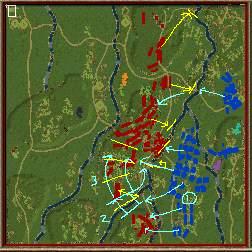
 Ths battle everyone has been waiting to see, former Championship finalists Rehctaw and Dark Lord go head to head in a surprisingly quick engagement, barely 12 minutes long! Here, DLplays the Protestant forces of William III (red) and Rehctaw the Catholic forces of James II (blue). DL quickly crosses the Boyne river on map right in customary fashion and arranges forces in line facing west, while seeming to withdraw his forces in the south/west. Rehctaw meanwhile mobilizes all cavalry and some infantry from his southern forces to augment those he has drawn up to face the recently crossed enemy on his right. Yet even as these forces arrange themselves, DL does an about face in the south, and pushes along the river, catching Rehctaw's depleted rear gaurd by surprise (1). As this periphial battle ensues, the main forces arranged on map right collide(2). The numbers of troops involved make it hard to call for awhile, as DL's cannon take a tole in grape and pike-men hold their own. Yet it is Rehctaw who dominates as he eventually enfolds DL's forces here, none escape. As the battle on map right goes against DL, he desperalty launches his forces arranged above the town across the narrow ford (3), and pushes his southern troops hard. Yet, Rehctaw's town defense holds and proves disasterous for DL. Though his southern forces emerge victorious, they are too late to help their comrades forcing the river. They face Rehctaws remaining forces alone (4), and when the last of them has fallen, Rehctaw controls the field with 547 remaining men.
(Review by [HWK]THE DRAKE)
____________________________________________________________________________________________________________
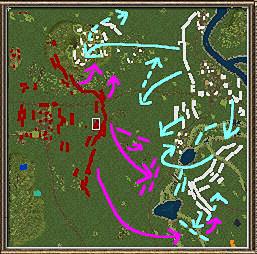
Rd 1 FB) Myself vs Easy at Hussar
When the battle starts Myself (red) makes a run for the city and secures this objective with his hussars. Meanwhile Easy (blue) brings his cannons to safety and moves his Hussars up.
Myself builds his defence up around his now conquered town, while Easy moves his troops in such a way he can attack the city from any angle he chooses. The first contact between enemy troops happens in the town itself as Easy's hussars clash with Myself's. Meanwhile the eastern flank of Myself attacks the eastern flank of Easy but Easy counter attacks and outflanks him. On his turn Myself throws in some troops that were waiting for an ambush and outflanks Easy with devastating effect. Then Easy commits his entire eastern side to the conflict, the situation for Myself in this area starts to look grim.
In the town where the battle between hussars still rages both sides have sent reinforcements but as yet there isn't a clear winner. Then red reinforcements arrive at the center and at the eastern edge. Myself is not only outgunning Easy but also outflanking him. Retreat is no longer an option for Easy as his men would be shot in the back. When the smoke settles there are no blue survivors left on the eastern side of the map or in the town.
Now Myself starts to encircle Easy as the eastern flank of Myself attacks the centre of Easy. Though pressed hard, Easy is still causing significant casualties. More and more troops are getting involved and its turning into a slaughterhouse on both sides. Easy is still in control of the center/southern area but most of his troops are committed while Myself still has a large army in reserve. By now Myself has completely surrounded Easy and attacks him on all sides at once. Myself starts to annihilate Easy and the last of Myselfs troops rush down to share in the glory.
After a glorious defence Easy yields.
Myself leaves the field victorious with 4303 troops left.
(Review by [HWK]Wombat)
____________________________________________________________________________________________________________
Rd 1 AOW) Meik vs Axle at Boyne
 The battle begins with AXLE (blue) as the Catholic Army of Ireland attacking in the south and withdrawing his remaining forces in the north towards the southwest. MEIK (red) as the Protestant Army faces a large enemy force in the south and makes a controlled withdraw crossing the Boyne River and taking up a defensive position. AXLE continues the attack and pushes north decimating MEIK's southern command. Meanwhile, MEIK moves most of his northern forces across the Boyne without opposition and takes the town and fields east of the town. MEIK also sends a small detachment of pike and muskets down the west side of the river. AXLE launches a devastating attack with his calvary wiping out MEIK's smaller infantry force. MEIK moves his main force south to engage AXLE who has set a strong defensive position in the southwest. Initially MEIK brings forward his cannon and inflicts heavy damage on AXLE's troops. AXLE responds with a massive counter attack which overwhelms MEIK's position and taking the cannon out of action. The battle intensifies as MEIK pours more of his forces into the battle and starts to wreak havoc on AXLE's right flank. Axles moves forward his cannon and quickly repulses MEIK's advancing troops. MEIK's position is compromised and he begins to withdraw only to face AXLE's calvary and remaining forces which win the day.
(Review by [HWK]Schooner)
_____________________________________________________________________________________________________________
RD 1 AC) Axle vs Meik at Fuentos de Onoro
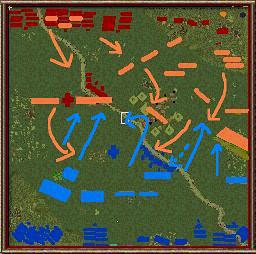
Meik (red, British) moves his forces into positions along the river. Meanwhile, Axle (blue, French) bombards the town as his forces move into position. His main thrusts are northwards and across the bridge in the center. A large bridgehead is soon established in the center due to his sizeable cavalry force which clears the way.
Meanwhile, Axle's attack in the far north meet little opposition and soon sweeps south to join up with his forces at the bridge. At this point, Meik counter-attacks with a valiant cavalry charge supported by some infantry. Axle's forces that have been moving down from the far north towards the bridge are halted and placed on the defensive. Meik's attack is beaten back and his forces retreat to a new defnsive line in the hills. Here, they hold defensive positions with bravery and determination before being overwhelmed.
In the south, after a succesful bombardment, Axle storms the town. But Meiks counter attack drives Axle out again. All the while, Axle's northern forces, having broken through Meiks defenses, make steady progress towards the town and towards the south. Meik trys an attack from the southern penninsula but after making some headway is beaten back. As Axle's forces advance ever nearer to the town, Meik withdraws his forces from the south and forms new defensive lines at the town.
After heavy figthing Axle reaches the town and stands eyeball to eyeball with Meik. It's now very close, and Axle decides on a surprise bayonett charge in the hopes he can overcome Meik swiftly and secure the victory he so desires. But allas, the charge falters, and victory is denied him. Meik counter-attack and routs Axle's remaining forces.
(Review written by [HWK]UK)
_____________________________________________________________________________________________________________
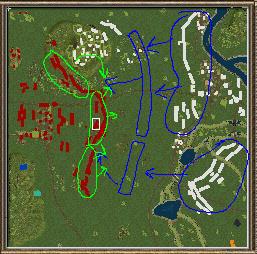
Rd 1 FB) Dark Lord vs THE DRAKE at Lobostiz
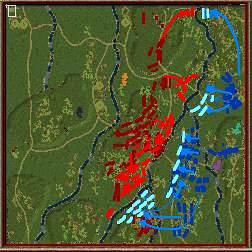
 Dark Lord comes on like a juggernaut, his Prussians (red) overwhelming and outflanking THE DRAKE's Austrians (white) on both flanks.The battle for the hills at map top goes against THE DRAKE as 4 of his regts sent to help the irregulars are flanked and destoyed.
Dark Lord's forces move down and cannon fire is concentrated on the Austrian Ctr. THE DRAKE's attempts to silence the guns comes to naught. Even as the Austrians move down their right, it is in turn engulfed. At map bottom the Prussians crash through 3 regts formed in line (the cavalry coming back too late), and THE DRAKE is left only with his Ctr.
As a robust Prussian cannon battery un-leashes on the Austrian Ctr and simultaneously flanks from behind the lake, THE DRAKE surrenders his few remaining regts.
Review written by [HWK]THE DRAKE
_____________________________________________________________________________________________________________
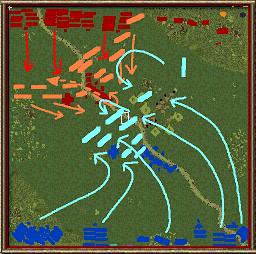
The battle starts with Schooner (red) moving his southern army fast across the channels and uniting then with the northern army. At the same time he moves a great portion of his northern army, which is facing the town, to map right and crosses the river, quickly establishing a defensive perimeter . Myself (blue) in the meantime starts an artillery barrage against the troops opposite his town in the north, while his Southern army remains in place. He calls up all the heavy cavalry in his power, as well as most of his dragoons in an impressive cavalry force, to face this new threat.
Myself launches a massive cavalry attack but it is repulsed with great losses, as they r no match against Schooners joint cavalry and infantry force. Myself , reacting to this, starts sending reinforcements but in small easily defeated detachments . Schooner is ready for the attack by this point.
Schooner attacks with a vengeance with half the troops that have crossed the river and attacks Myself's scattered troops sent to stop him. He wipes them out, and manages to flank those troops. He even starts rolling down the line, while Myself tries to form a new line to stop this attack,
At the same time Schooner commits his reserves and attacks Myself's new defensive line, which buckles under the intensity of the attack. Schooner briefly pauses to consolidate his gains, and heads for the town to finish the remnant of Myselfs army.
Schooner attacks, and the troops that have been waiting across the river opposite the town finally make their move. Attacked on both sides, Myself has not the man power to face this multiple attack, and is ultimately defeated.
(Review written by [HWK]Greenwarrior ![]() )
)
_____________________________________________________________________________________________________________
Rd 1 AOW) Sir William vs bhive at Eylau
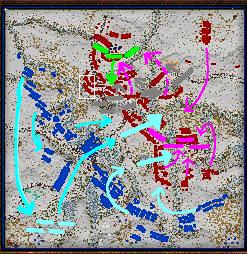
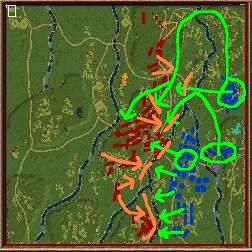
Here, bhive plays the French (blue) who are on the attack and SirWilliam the Russians (red) on defense. SirWilliam immediately draws back his left flank (map right) and forms a new line farther back, simultaneously reinforcing his center until he has a good solid angle formed on his center.
bhive pulls down his cavalry from map top and consolidates other cavalry units with them in the rear. Meanwhile, his infantry stay formed in columns but stay scattered. He forms no cohesive lines while his cannon start to shell the Russian lines. However, the Russian batteries are not silent either and take their toll on the French columns.
Still, while the French cavalry and cannon are active, the infantry are disorganized. Different units wander forward to clash with the solid Russian line, the Bavarian grenadiers being the first. Then, as the French cavalry move up to their front, the whole French army concentrates on the solid Russian center and surges forward.
The attack looks futile and un-organized. bhive is missing many cannon already that were destroyed early by a daring cossack raid. Yet the attack pushes forward, and what once looked like a suicide charge turns into a deadly crash through the Russian center, destroying not only the center but the Russian left which tries to help.
SirWilliam has now lost many cannon himself, and though he still outnumbers bhive by 1420 troops to 980, he withdraws. The momentum is on the French side, and the Russians hastily draw up new lines on a hill in the north forming a dense defensive perimeter (bright green). Bhive's numerically inferior force seems to outnumber the enemy as he in turn draws up a wide line facing the hill (in gray). Now, the French have a good 30 cannon to the Russian 20. Located on the extreme left of his new line, bhive uses his battery to decimate rows of Russians.
Not wanting to endure this for much longer, SirWilliam makes a bold dash off the hill with all his forces straight for this battery. At first, French grapeshot mows down the attack, but not enough French are stationed nearby to protect it and the battery is eventually captured. At this point, the bhive concedes defeat. SirWilliam gains the field with 664 men remaining.
(Review written by [HWK]THE DRAKE)
____________________________________________________________________________________________________________
Rd 1 FB) SirWilliam vs Bud at Lobostiz
(Review written by [HWK]Person)
____________________________________________________________________________________________________________
Rd 1 AC) GiNg3RfiSh vs Rehctaw at Fuentos de Onora
Gin3 (French, blue) opens with cannon bombardment on the town while swiftly moving forces up to south island for his main attack. Rehctaw (British, red) moves up to all the crossings and adopts a defensive position. Gin3, having launched his attack on the south island, takes it and surrounds the defenders and wipes them out to the very last man, while suffering very light losses. He immediately storms across to the mainland. Rehctaw tries to hold but is pushed back into the southern hills where he reforms, while attempting a counter attack across the river south of town. This desperate attempt is beaten back and the regiment is routed. Rehctaw tries again to counter attack Gin3's forces which are now swarming across the river but is stopped in his tracks and forced back. Gin3 is a commander in a hurry giving a whole new meaning to Lightening Strike. Rehctaw rushes reinforcements from the other fronts but is too late. Nothing he can do can stop Gin3 and his steamroller now, which by then has formed new lines to the south of the town and marches on in triumph easily smashing any defensive attempts by Rehctaw. Its all over in 27 mins. Gin3 the victor has 3800 left to Rehctaws 600 approx.
(Review written by [HWK]UK)
____________________________________________________________________________________________________________
Rd 1 AC) DarkLord vs Sharpe at Fuentos de Onoro.
After good luck wishes on both sides Sharp immediately sends his troops to the bridges and crossing points to protect them. The south island he abandons for a better defence across the bridge. Meanwhile Darklord(blue) is makes a strong attack line in the south. Darklord invades the now lonely south island with ease but the cannon left behind is still able to grape some musketeers. They face each other at each crossover, waiting for the first move.
Then Darklord sends his purple brigade into a death charge at the middle upper crossing it fails but it does some damage, at the same moment Darklord sends all his heavy cavalry to the south island, making ready for the big push.
Then the battle starts, Darklord begins by sending his infantry over the bridge trying to secure it and buying time for the rest of his infantry to cross. They are of course sitting ducks for the line Sharp(red) has formed, and Sharp is making Darklord pay for every yard he takes. Then out of nowhere a cannon of DL grapes the centre of the line it kills only hundred men. But those were very important men, as if that isn't enough the entire heavy cavalry charges over the bridge and smashes into the defending line, destroying all in it path. Then it is stopped in its tracks by some brave defenders who have moved into square formation. The cavalry charge losses its momentum, but it has done its job. DL can now cross the bridge with his men without having to fear enemy fire.
Slowly DL builds a very long line with which he can easily outflank sharp. Again DL attacks with his now new formed line but Sharp doesn't scare easy and is holding the line, then another massive cav charge from DL, the charge fails but did enough damage that DL's inf can finish the job. But of the once proud cav of DL little remains. The second part of the defense line is now in retreat but the S/W is still holding out, bravely buying time for the others. The S/W flank gets annihilated but bought enough time for Sharp to regroup and send reinforcements to the hill. Both sides have now lost most of their cav and have sustained serious infantry casualties making it a pretty even match to this point. Although evenly matched in numbers Dl has the better position and the bigger line and so he smashes the resistance. Sharp decides to do some tactical manoeuvres (read retreat) and ends up in his partly shot up city, readying himself for the final confrontation. Then DL attacks for the final time, first little probes then a full-scale assault. Sharp is working miracles, holding DlLoff. But even his miracles don't save him as he's almost surrounded and blue has now at least twice as many man. After a glorious battle Sharp surrenders.
Darklord leaves the field victoriously with 4455 men left.
(Review done by [HWK]Wombat)
____________________________________________________________________________________________________________
JUST LIKE TO THANK ALL MEMBERS WHO REVIEWED THE GAMES BIG THANKS!!
MORE REVIEWS TO COME!!!
KEEP A LOOK OUT!!!